Saturday, February 28, 2009
Apologies
I am new to the blog and flickr thing and am still getting used to things. I have been going back through posts and adding tags (hoping that will make it easier to find things later on down the line) and reuploading photos to flickr at a bigger size. However, each time I edit a post, it seems like it resends it to anyone who has this on a blog reader. So for those of you who are reading in old posts in with the new... sorry! I should be on top of it by the end of the week end!
Fabric Forming Posts
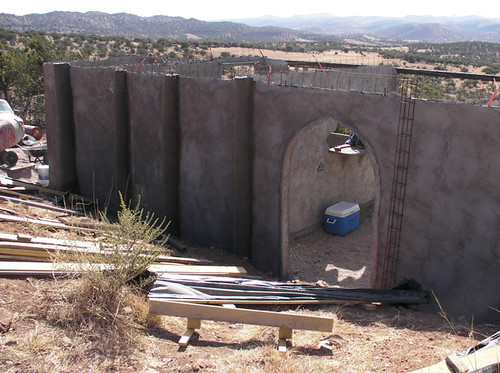 We have started back on the house this week. It's been rewarding, but tiring, as we are having to get used to working in the sun as the temperature climbs into the 80s.
We are now preparing to do the roof...yippee!
First off, we poured some posts on the north side of the north wall. The eventual plan is to half bury this wall and then build the kids' rooms on that higher level. However. until this next stage of the construction is completed, we were concerned that the wall would be able to give a little under the weight of the roof. So we poured 6 posts as extra support.
We are always looking for more efficient ways to do all the different aspects of building, and we feel we have a winning addition to this quest... fabric forming. In this case, we used the technique for posts, however it can be used for all kinds of things, including footings, arches, benches, etc.
We:
Dug a hole at base of wall where we wanted the posts to go.
Placed a castillo in the hole, raised up on rocks (you want concrete under any metal, so that there is no chance it can leach water and rust).
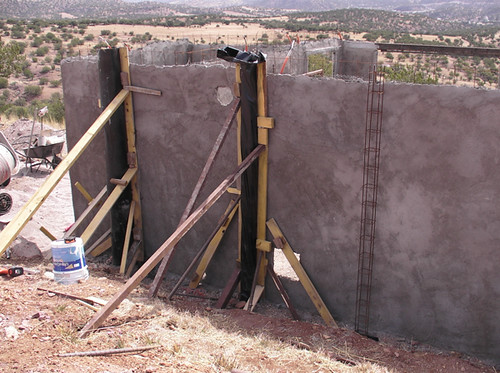
Tied the castillo to the top of the wall, with a gap between them and the wall.
stapled black plastic to two pieces of 8 foot 1x4s, 16 inches apart.
Placed one of the pieces of wood either side of the castillo, so that the black made a slack U around the metal.
Braced the wood, so that it was held tightly against the wall.
Poured concrete into the plastic, patting it as we poured.
It came out way better than we could have hoped. It was an extremely fast and easy form, and the final result was beautiful and rounded.
Two things that are a little odd, and we can't explain why they happened are:
1)The posts set up far faster than any other posts we've done, although they are drying out very slowly.
2)The concrete is a lot whiter and harder than other concrete of the same brand.
All in all, we loved our first taste of fabric forming and cannot wait to use it for footings and other projects.
For more photos, click here.
Bottle Wall
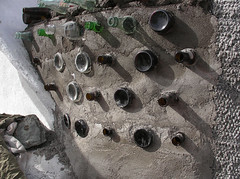
While Abe and a friend have started to frame the roof (I'll make a post on that at a later date, when it is a little further along), I begun a small bottle wall that joins the current building to the new one on the south side.
It's a slow, but very enjoyable project. I've only done 5 layers so far, but the light already comes through and the wind plays them like an instrument.
I'm using a 3:1 mix with added fibers and I LOVE the fibers. They are cheap, but make the stucco so much easier to smooth and sculpt. Plus there has been no cracking, even though it has been hot and very windy, and my covering is constantly blown off.
We are using bottles found by the side of the road. Unfortunately, we don't have much variety beyond clear and brown, although Abe did find 4 blue bottles on his last city trip, which will be going in soon!
For more photos, click here.
Photos and Videos of Leo

To the family and friends that have asked for more regular photos of Leo, I will put be putting them on flickr each weekend. At the moment, they will all go in the Set titled 11th month (under the Leo Collection ).
We are generally tired at the end of our days during the week, and do not go online, so you'll just have to make do!!!
Wednesday, February 18, 2009
We have a pond!

Well, what began on the 28th January is now finally finished. Yep, that's right, we have a pond! It took almost three weeks to do the 15 hours of machine work, but it's there now, and it doesn't look like it's going anywhere any time soon!
The photos don't do it justice, but it is HUGE. Even the spillway is big.
Now we just need it to rain! Expect to see photos of us swimming on our property some time in August.
Of course, just because our pond is finished, doesn't mean the machine ordeal is over. The machine is still on our property and is broken down again. They will be going to the city to get parts tomorrow. Shame the bottom has fallen out of junk metal...
For more photos of the pond, click here.
Sunday, February 15, 2009
Hand washing laundry
laundry video
Originally uploaded by velacreations
Fill a tub with about 5 gallons of water (enough for a medium sized load) and add all natural soap.
Add your clothes and leave them to soak for a while (I leave them overnight).
Rub each item of clothing over a washboard, dunking it in water between each rub.
Wring out and put aside, ready for next rinse.
Repeat this process a further two times, totaling three washes (15 gallons), leaving them to soak a little in between.
Hang on the line.
Put your grey water on the garden.
I take two days, including drying time, to do a load of laundry, because I am in no rush and like to leave our clothes soaking in between. You could do each wash one after the other and be done in less than an hour.
One thing that really surprised me was how clean you get your clothes. I had always assumed that a machine would get them cleaner, but this is not the case. I brought this up to my husband after using a relative's machine. His reply was, “Of course. There isn't a tiny little women inside the machine scrubbing them clean.”
New Pond

Our building project has had a small setback these past few weeks, through no fault of its own.
About two and a half weeks ago, a Caterpillar Bulldozer for hire came to the area. We seized the opportunity to get a pond dug before the rains come. The south-east corner of our property is a small ravine, where a lot of our hill's rain ends up. We are going to dam it up to make a big pond, which we plan to use for fishing, swimming, and irrigating orchards and crops. All in all, it will hold about a million gallons and be about 60,000 square feet (an acre and a half). It may take two years of rain to fill, depending on the rainfall we have this year, but it will ensure water for every need imaginable.
The first day, the operator worked for 4 hours on it and got a lot accomplished. He also hit a large pocket of caliche, which he'll use to coat the bottom (driving over it several times to compact it). We were so excited and spent the evening sitting in our dry pond, dreaming of tire swings and fish barbecues.
The next day
 , the guy arrived at 9am, tried to start the machine and... nothing. We have since had workers, mechanics, the boss here every day. They have had to rebuild the engine. And of course, every time they find something else that is wrong with it, they have to drive the two hours to the city to get parts. It was finally fixed yesterday, although today they still seem to be having some problems!
In the meantime, we need to go to the city to get materials before we can start on the roof. Because they are constantly needing tools and we are also feeding them, we have not been able to make that trip. Oh well, pretty soon it will be fixed properly and the pond will be finished, and we can get back to our plans.
For more photos of the pond, click here.
Leo is now 10 months old
jan09walking
Originally uploaded by velacreations
Just after he was born, the two nurses walked the two kilometers from the village to our place with an ice chest containing rabies shots for all our animals. They injected all the animals and then spent the rest of the afternoon crooning over the newborn. There's no way to beat medical care like that, and we are very grateful that these are the people that will tend to our little guy when he is sick or injured.
All in all, Leo is about as happy and healthy as they come. He has had one cold in his 10 months, lasting a day and a night. He also threw up one night after I took some Grapefruit Seed Extract, not knowing that too much vitamin C does not sit well with babies. The only other illness he's suffered has been teething related (upset stomach and slight fever). That said, we have had a rough couple of weeks. He has had his two top front teeth coming in for a while and he seems to really suffer with it. But they FINALLY cut through yesterday, and he seems fascinated with them. Just 16 more to go...
 This past month has seen some incredible changes. He is now cruising around our one room like a torpedo. No solo steps yet, but that doesn't seem to hinder him. He has all his routes figured out, so that you can put him down at one end of the room and before you know it, he's on the other side. If he can't make it across a gap, he puts his hands down and lopes like a gorilla (he has unfortunately never learned to crawl!). He'll get to something like the compost bucket or wood box, turn around, look at you, grin and go for it, and you have to lunge to stop him. Although he'll often feign ignorance, he knows exactly what the word “no” means!
Language abilities are also developing. He understands a lot of what we say, and responds physically. When you say hello or goodbye he waves; when you say “saluda-me” (shake my hand), he does. He'll kiss (or rather put an open, slobbery mouth against your cheek) when you say “kisses”. And he loves to copy you! He also has three words that he says. We had thought/hoped his first words would be “papa”or “mama”, but not so. He says “wa-wa” consistently
 to ask for water, a kind of gurgled version of “good” when he's eating something delicious (his favorite is oranges), and a guttural, garbled sound like “thank-you” when you give him something.
He now always poops in his potty (see our article about Diaper Free Baby if you are interested), but still pees in his diaper occasionally. We don't even try and put him on the potty when he wakes at night as it is a little chilly. As his communication and mobility skills improve, so will his toileting abilities. Once it gets warmer and he will be wearing less clothes, we'll be taking the diapers off altogether and start training him out of the accidents (though will expect them to happen for quite a while longer).
In a nutshell: he laughs constantly; flirts with anyone who shows interest (although when he first meets someone he will just stare at them for a while); loves to be outside; tries to pet every animal he sees (luckily the rattlesnakes aren't out yet!); wants to be thrown in the air as often as possible. We feel
 very lucky.
The one thing he has never quite got the hang of is sleeping. He still wakes a couple of times in the night to nurse, though does go straight back to sleep afterwards. We have read about various techniques to break a child of this, but most involve letting them cry it out – an option that is very hard to do when he sleeps right by my ear, and heart!!! Once we have finished building the next rooms, he will be moving into his own bed, and the lack of proximity might help him sleep through. Until then, it doesn't really bother me that much. I figure it won't be long until he'll want little to do with us, so I'm happy to take the cuddles when I can!
For more photos, click here.
Monday, February 2, 2009
Reusing plastic bottles

VOTE FOR US!
We have a new Instructable entered into a Plastic Bottle Reuse contest:
Instructables
In the not too distant past, you would buy milk, sodas, etc. in glass bottles which you would return to the store to be sterilized and used again. Now, with our disposable culture, plastic bottles have replaced this system and have consequently become one of the many banes of the landfills. We need to rectify this wasteful and eco-nomically expensive practice.
The current popular solution to the problem is recycling. However, recycling requires additional energy to process the material into something usable, not to mention the fact that the process itself can have harmful side effects. So a better solution, if you can't avoid the disposable containers altogether, is to reuse them. This requires no added infrastructure costs and concerns. In fact, if you are reusing junk, you are helping to make the initial energy that went into the production of that material last longer and go farther. It’s not just about saving money, but more importantly, integrating your lifestyle with what is available for the least amount of cost, be it environmental or financial.
That said, we have a new article on the site, offering some quick and easy ideas on how to reuse plastic bottles around the homestead.
Subscribe to:
Posts (Atom)