Vela Creations is an in-depth resource for off grid living. The site documents our research and experiences, hoping that they might help others interested in pursuing this lifestyle. This blog is designed to document our day to day experiences as we build our new, sustainable homestead. If you are interested in seeing more photos and videos, we have a flickr account at the following url: http://flickr.com/photos/35090117@N05/collections/

Showing posts with label compost. Show all posts

Saturday, April 23, 2011

Finished wicking beds

SANY7954 We also managed to finally finish our wicking beds this week and make a bed for currants and berries on the overflow to the gray water system (that feeds the inside flower beds).

There wasn't a whole lot to do, but we have had so much wind this month, that we hadn't been able to get to it beforehand.

SANY7924 We emptied the rest of the compost pile we had made for a winter heater for the bedrooms into the both beds, and then finished off the fence around it (one of our dogs had assumed we'd made the bed just for her). We have soil blocks with little seedlings ready to go out there. We have been taking them out each day so that they can harden up a little, before we transplant. Next week we plan to plant.

One sad piece of related news was that some kind of bug or mouse or something ate all our little raspberry seedlings this morning. Hopefully we can make some more come up without too much grief.

For more photos, click here.

Monday, March 7, 2011

Wicking Beds

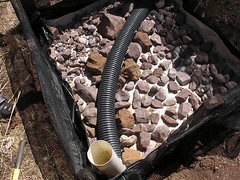
SANY7601 This weekend Abe got a couple of lads from the village to come and help him make two wicking beds (I am not much use with a pic and shovel at the moment).

A wicking bed is basically a box-type planter, which is watered from the bottom.

To build it, they:
- Dug into the ground a little, making sure the bottom was level.
- Buried 6 stakes, which mark the corners and middle of the box.
- Attached shade cloth to the inside of the stakes.
- Lined the bottom half of the box with black plastic and a vinyl tarp (to protect the plastic from being torn by rocks.
- Put a 4" drainage pipe (with holes along it) in bottom of box, and then put 4" PVC into it. This is where you water your plants from.
- Filled up bottom half of the box with gravel and sand.
- Filled up rest of box (where there is just shade cloth, no plastic) with compost.

You add water into the PVC pipe, which drains out into the gravel. The soil will then wick the moisture up to the plants. To wick well, it must have high organic content. It is highly efficient with water. We will also be adding a frame above that can hold either shade cloth or greenhouse plastic.

SANY7637 For more photos, click here.

Our gray water interior flower beds work on a very similar principle. As you can see by the photo, it seems to be working pretty well. Here are some more photos of them.

Sunday, November 21, 2010

Compost heater

SANY6845 Another thing we did this week was build a compost heater.

The brick walls on the north side of the bedroom can get a little cold this time of the year, so we are trying an experiment. To the north of Leo's room, we built a big, insulated box out of hay bales, 14 feet by 4 feet, 3 feet tall. We then lined it with a tarp and put layers of weeds and manure into it. After wetting it down we covered it with a tarp and insulation.

We'll see how it works before we do outside our room. So far, it is doing great. It has definitely heated up. The bricks lower down the wall are considerably warmer than the ones higher up. Time will tell how much it warms up the room and how long it will last. The great thing is that even if the experiment is a failure, we will get a whole bunch of compost out of the deal!

For more photos, click here.

Saturday, October 17, 2009

Winter Planting

We made use of bad weather this week to do some gardening.

We harvested all the beans, potatoes and most of the winter squash. All that's left now is collards, cabbage, turnips, carrots, parsley and lettuce.

We cut all the weeds and plants that have already produced, making a huge compost pile. We then replanted most of the beds with wheat, rye and barley, and spread compost on top of everything for food and mulch.

This year's focus has been the house. Next year, we hope to concentrate far more of our time on the food systems.

Sunday, August 2, 2009

Gardens/chickens/worms

This year has mainly been dedicated to building, so we have not had as much time as we would have liked to work on the food systems. Next year we plan to mainly focus on this, with the additions of fish ponds, rabbit tractors, and planting trees, as well as increasing our gardens.

However, we did still plant our garden once the rains started. The soil is so much richer than when we first started – it has grown from clumpy clay to a rich, dark, crumbly soil, all through the addition of compost and mulch. So far we have been eating squash, green beans, collards, cabbage, herbs. We have turnips, beans, corn, beets and various other things growing. (more photos)

We have also started a worm bin. At the moment we are feeding them and letting their population increase. Once we have a lot more, we will start adding them to the garden, the humanure pile and feeding them to the chickens.

We did have some chicks this year, but disaster struck. The mama hen had made her nest outside of the coop, so we did not put her up at night with the other chickens. She hatched her eggs, but was then killed by a predator. We saved two of the chicks. Abe built them a chicken tractor. This is a movable pen, so that they get to graze one area, and then before they do any damage we move the pen. They seem very happy in there and we hope to buy some more chicks to keep them company. (more photos)

Blog Archive