Vela Creations is an in-depth resource for off grid living. The site documents our research and experiences, hoping that they might help others interested in pursuing this lifestyle. This blog is designed to document our day to day experiences as we build our new, sustainable homestead. If you are interested in seeing more photos and videos, we have a flickr account at the following url: http://flickr.com/photos/35090117@N05/collections/

Saturday, August 29, 2009

Gutters


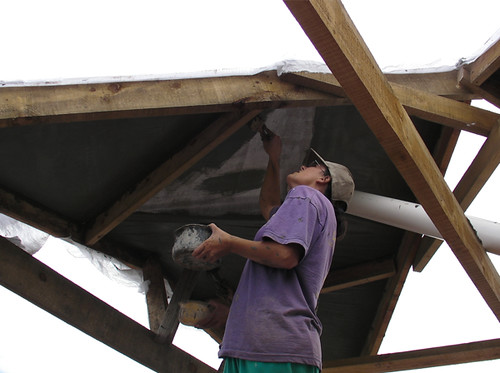
The roof to the kids' rooms is now finished.

- We put the remaining layers of latex concrete on the roof.
- We filled up the holes we had left for easier access.
- We painted the whole thing with a white waterproofing paint.
- We attached gutters to the sides.

So that roof is now done and catching water.

More photos

Brick Floors

This week has seen our first floor laid, and it went really well. It is the first floor we have had in the 7 years we've been together, so probably anything would seem great.

It is a brick floor, using compressed earth bricks that were stabilized with cement.

- We started off with a compacted sand base.
- We put black plastic down first as a vapor barrier.
- We laid 1 inch insulation over the whole floor.
- We cut a piece of remesh to fit the room.
- We tied PEX pipe going up and down the room. This sub floor pipe will be heated by solar boilers that we will later install on the south side of the roof.
- We put screened sand on top of the pipe, which we then leveled.
- We laid the bricks on the sand in a running bond pattern, knocking each brick level and tight against its neighbors with a rubber mallet.
- We cut the edge bricks and laid them.
- We swept screened sand into the cracks. As the sand settles we will sweep more sand into the cracks until they stop settling.

We will have to leave the floor a while before we can seal it, but it looks finished. Furthermore, the living room is now fully painted, so we have our first room done (more or less!!!). Very exciting.


More Photos

Friday, August 21, 2009

Latex Concrete Roof

Despite only having three work days this week, due to rain, we have got the first two coats of latex concrete on the kids' rooms roof.

It's too soon to tell, but we think we have found the way we will do roofs from now on. We are always looking for the best way to build, balancing the Time, Cost, Energy factors (strength and durability being things that cannot be compromised). Walls are easy, with endless good options out there, but the roof is one of the most important and expensive elements of a building, and up until now we have not found the system for us. However, that seems to have changed...

Its advantages are that:
- it is very light, so the support structure does not need to be as extensive as with other materials.
- it sets up super fast, so you don't have to be as scared of clouds on the horizon as with concrete.
- it is very fast to apply, almost equally the speed of putting up tin, which is a material we do not want to use as it does not last as long or look or sound (in rain) as nice as concrete options.
- for its strength, durability and speed, it is cheap.
- it allows for many different designs, though a pyramid structure seems to be the most efficient.

We had never tried this method before, but it was very easy. This is what we did:
- We made a wooden frame, in a three peak design, set on concrete posts.
- We then stapled two layers of fiberglass screen onto the frame, alternating the direction of the fabric for each layer.
- Once the fabric was in place, we poured our mix onto it and brushed it in with long-handled broom type things. The mix wants to be pretty liquid for this first coat, so that it penetrates the fabric.
- We then used paint brushes to put a slightly thicker mix onto the underside.
- We left three of holes in the structure, at the tops of the peaks, so that we can pour the next coats easier. We will pour these before we do the final coat, when we can walk on top. Latex concrete binds very well to itself, so we do not have to worry about cold joints, as with concrete.

The mix for these first two layers was a 1:1 of acrylic and cement, adding a little water to make it more runny. We used a product called Sikalatex, but we ran out and have moved on to a 100% acrylic concrete bonding.

We will now put 3 more layers on top, though these will consist of a 1:1:1 acrylic, cement, and fine sand. Even after just two coats, the structure is hard (will probably be able to walk on it after just one more coat) and fairly waterproof - water seeps through as it cures, but does not really drip. We should be able to do two coats in a day.

For photos, click here.

Sunday, August 16, 2009

The chicken population on this property has grown substantially this week.

We already had 9 grown chickens, 2 of which are roosters, and 2 chicks, whose mama was killed by a predator when they were just a couple of days old.

We let the chicks loose in the garden, which is fenced, and they are super happy there. They disappear into the undergrowth, and stay very busy eating bugs off our vegetable plants. The only downside was that they seemed so small in there, as if they needed a few companions. So when a man came to the village selling chicks, we couldn't help but buy 15, for 45 cents apiece.

They were just a day or so old, and so very susceptible to the elements. We have therefore set them up in the dining room flower bed for now. We bring them into our bedroom at night, in a cardboard box with a hot water bottle under it. When they are old enough – when their feathers start to come in - they will join the others in the garden.

Then today, we went to a small town nearby and ran into a friend who had older chicks for sale. We bought 10 of those as well, for 75 cents apiece. They are not nearly as vulnerable as the babies, so they have gone straight into the small chicken tractor. Once they have become used to roosting in there, which is sheltered from rain, we will open its door into the garden too.

So in total: 9 adults, 12 chicks, 15 newborns. Leo is as happy as can be – everywhere he looks there are chicks to play with.

More photos

Framing the roof of the kids' rooms

This week, we finished the concrete, fabric formed posts that will support the roof to the kids' rooms. They are 11 feet apart east to west, and 12 feet apart north to south.

We also started framing the roof. We put up the base frame, which is 12 feet by 33 feet, and 2 of the 3 peaks, which rise 3 feet in the center.

We used 2”x6” wooden boards for the frame. Normally we would use metal, but with this technique (latex concrete), wood is easier, as we will be able to staple the fabric into it, as opposed to using glue if the frame were made of metal. This will all become clear next week when we apply the latex concrete.

For more photos, click here.

16 months old


Leo is now 16 months old, and any new photos this month will be put in the Flickr set 17th Month.

Saturday, August 8, 2009

Link to Leo photos


Don't need to add anything about Leo since the last post, but click here for more photos and videos.

2 stairs done

We also started pouring the steps going from the dining room to the kids' rooms.

We had thought about doing them all together, but the formwork would have been complicated. Instead, we figured we would do one step a day, keeping our formwork to little more than board and a backfill of sand.

We used fibers in the mix, and added metal to both the horizontal and vertical part of the step. At the end of the pour, we added dry cement, which we trowelled in to soak up excess water, and we then floated them once the concrete had hardened a little. They have come out super smooth and nice.

Each step (other than the first) will be 7.5 inches tall and 11 inches deep..

2 down, 6 to go. We're moving up.

More photos

Posts getting done

Our progress on the kids' rooms has moved in three directions.

Firstly, we made a dry-stacked retaining wall north and uphill from the building site. At its base we dug a drainage ditch, in which we placed a 4 inch drainage pipe. We then filled the ditch in with rocks; gravel will be put on top of the rocks next week. More Photos

Secondly, we have begun to put an 8 inch layer of sand over the whole area. This will be compacted to 6 inches right before we pour the foundations for the walls. We will then fill in the rooms with more sand, up to the top of the foundations. Most of the rooms are covered, other than close to the northern posts, as we have been working on those, and sand would have gotten in the way.

Thirdly, we begun pouring the posts that will support the roof, which we are building before the walls. We have poured 3 of the 4 northern posts, and halfway up on 3 of the 4 southern posts – these must be done in two stages. We did these posts using black plastic stapled to wooden posts. They come out round, and one of them in particular came out super funky, as we didn't put enough staples in and the plastic started to separate from the boards. Oh well, funky kinda fits here! More photos

New Water Tank

This week we set up our new 1000 gallon tank. That totals 2400 gallons, and will be more than sufficient to last us until next year's rains, by which time we will hopefully have built our 7000 gallon ferro-cement tank.

We made it on 1400 gallons from the rains of last summer until this June (we do usually get a little rain in winter, but not this past year), but only just. We were two days away from having to haul water. Admittedly we weren't using our own water for construction, which we brought in from the village.

This is more storage than we have ever had before, and we love it. The only drawback is that we had a ton of rain this weekend, which all overflowed onto the ground. And since we installed the tank on Tuesday, we have had little more than a drizzle!! Oh well, it'll come.

More Photos

Sunday, August 2, 2009

Gardens/chickens/worms

This year has mainly been dedicated to building, so we have not had as much time as we would have liked to work on the food systems. Next year we plan to mainly focus on this, with the additions of fish ponds, rabbit tractors, and planting trees, as well as increasing our gardens.

However, we did still plant our garden once the rains started. The soil is so much richer than when we first started – it has grown from clumpy clay to a rich, dark, crumbly soil, all through the addition of compost and mulch. So far we have been eating squash, green beans, collards, cabbage, herbs. We have turnips, beans, corn, beets and various other things growing. (more photos)

We have also started a worm bin. At the moment we are feeding them and letting their population increase. Once we have a lot more, we will start adding them to the garden, the humanure pile and feeding them to the chickens.

We did have some chicks this year, but disaster struck. The mama hen had made her nest outside of the coop, so we did not put her up at night with the other chickens. She hatched her eggs, but was then killed by a predator. We saved two of the chicks. Abe built them a chicken tractor. This is a movable pen, so that they get to graze one area, and then before they do any damage we move the pen. They seem very happy in there and we hope to buy some more chicks to keep them company. (more photos)

16th Month

Leo is now 15 ½ months and a handful! For the most part, he is a happy, adventurous, curious, funny child. However his teeth are popping out left, right and center and he really suffers from them. We can tell when a new tooth is pushing through, as it is preceded by a swollen, blood-blistered gum. Poor little guy.

He prefers to spend most of his time outside, running barefoot all over our rocky, muddy hill. He is also delighted to be taken for walks in his sling. He'll let you know when he wants a walk (not always when you might want one!!!) by getting his hat, your hat and the sling, and then waiting impatiently for you to get your shit together.

He loves all animals. He makes noises for cows, dogs, chickens and bugs, and start trotting up and down when he sees a horse. And he'll often bend down on all fours (but without the knees touching the ground) and walk around like that saying “booooooo” - his word for moooo! He loves to play with bugs, but he will come and get your hand and make you touch one before he will.

He also loves water. He drinks more water than any child on the planet. He will shout “wa wa” as soon as he sees a bucket, a puddle, a river, and now even when the clouds look fit to bursting, and then he runs over to it and puts as much of his body in it as possible. He has been in the river, but not very deep. If we get some free time soon, we want to take him swimming in the river. He has never been swimming before, as this is the only time of the year when the water is warm enough for him, and we just haven't had much time.

Music is another one of his favorites. He will dance at any sound of music, and he has even started to sing!!!

His dexterity is getting much better. He can spend a long time screwing on and unscrewing bottle tops, and lids of all kinds. He can put all the shapes in the holes, though often needs you to point out which one to try. He can put the different size rings on their post. Anything that he feels is beyond him (like opening a door), he will not hesitate to grab your hand and lead you to the obstacle for you to try.

Food has always been a strong point for Leo. He now eats pretty much what we eat, even loving chile colorado! He can eat fruit all day long, as well as yogurt.

As far as language skills go, he doesn't yet say that many words. He does however understand English and Spanish equally, and we are curious as to how that will affect him as he adds new words to his vocabulary.

He loves his playtime rough. The higher you throw him and the faster you spin him, the louder he laughs. This does not bode well for the future peace of mind of his mother!!!

The thing that always amazes us is his sense of humor. He loves to laugh and make you laugh, which is normal with babies. What seems to be unusual is the quality of his jokes. He is genuinely funny, even at an adult's standards, and he seems to know when a joke has been thrashed.

On the downside, he is starting to throw little tantrums, especially when he is tired. He'll stomp his feet and scream, when he can't have something he wants. Abe says we should lock him up in the chicken coop when he behaves like that, and perhaps he has a point!!!!!!!!!!! Oh well, it's the age for it, I guess. As he communication improves, we hope the tantrums will too, but we fear we are only just getting a taste of what is to come. Small price to pay I guess for this beautiful, little boy.

More photos and videos

Kids' Rooms

This is the project we are currently working on. There will be two bedrooms, with a 7 foot wide staircase/bookshelf going from the dining room up into them. The walls will be built with Compressed Earth Bricks, as will the floors.

The roof , which we are going to build first, set on concrete posts, will be made of latex concrete – a very fast, light, strong, easy method of building roofs, and our first time of using this system.

So far we have been prepping the site. We put a drainage pipe at the base of the current wall, just in case water should ever get under the rooms. We then put black plastic against the wall and filled in with gravel. The rest of the area has been filled in and leveled with dirt.

We built concrete retaining walls around what will be the stairs, and on the ends. And we are digging a drainage ditch to the north and uphill of the site, so that water should never get under the building.

So far, we have poured the bases of the northern posts and this week, we will be working on finishing the posts and starting to pour the stairs.

We will keep you posted on how this all goes.

More Photos

Interior/Exterior


The exterior, where no rooms will be connecting (east and south), is now finished. We put a cement/fiber/lime coat on the concrete, then a waterproofing paint, then a colored paint. We ran out of one color for the wall around the door, but have now got some more and can finish it when we have time, though this is not a priority as it is purely aesthetic.

The interior is NOT finished. Water can still get in on the north side where there is a doorway to the kids' rooms, and so we have decided to do that roof first before finishing the interior of the kitchen/dining/living rooms. Once that is done – hopefully not too long – we will then lay the brick floors (with insulation and hot water pipes underneath), plaster and paint the walls and ceiling, and then install cabinets/shelves/furniture, etc. I CANNOT WAIT TO HAVE THE EXTRA SPACE!!!!!! I am a tidy freak, and for a long time I have been running out of places to put things. Cannot wait to have a kitchen, and a table, and floors, and... well, you get the picture!

More Photos

Temperature Controls

Because we live off the grid, energy and water efficiency are a priority. We have thus designed the house to use as much natural heating and cooling as possible.

First of all, the insulation helps keep the inside temperature constant. For example, when it rains at night here, the temperature outside can drop 20 degrees, while inside it will only drop 3 degrees.

Secondly, we have built eaves on the south side that allow sun to enter the back of the room in winter, when the sun is low and the warmth is needed. However, in summer, when it's hot and the sun is high in the sky, no sun comes into the room. Seeing as most of the south side of the house is window (all double-glazed), this will significantly help our temperatures. The excessive windows also help with minimizing the need for turning on lights. Even on a super cloudy day, no light is needed.

Thirdly, we have buried the north wall of the house up to about 5 feet. This is where the kids' rooms will be, up a flight of 8 stairs. The buried wall has incredible thermal mass, thereby helping to keep the interior temperature constant.

Fourthly, before filling in the dirt on the north side of the house, we buried pipes that loop from the living room to the kitchen. Because the temperature underground remains pretty much constant year round (like in a cave), they will be much cooler than ambient summer temperature and even warmer than a cold winter's day. We can put a small DC fan on one end, and cool air will come out the other, making it an extremely energy efficient air conditioning. Furthermore, we will be installing ceiling fans in a couple of the rooms, for any super hot, still days.

Fifthly, when we lay the brick floors, we will be putting pipes under the brick, whose water will be heated by solar water heaters that we are going to install on the south side above the kitchen. This will also be our source of hot water for the kitchen and bathroom.

We haven't yet seen a winter in this house, but we are very happy with how it performs in summer.

South Flower beds

At the base of the huge windows in the living and dining rooms, on the inside, are two flower beds. They take up the whole south wall.

They are made out of ferro-cement – remesh, rebar and lathing that is stuccoed with concrete.

The grey water from the kitchen and bathroom will be routed into these and we will be able to grow year round.

At present, they have coarse gravel in the bottoms, which will help clean the water, as will the plant roots themselves. Once we do plumbing, we will then be able to fill them up with a rich compost soil.

More Photos

Windows and Doors

We now have all the doors and windows hung.

We have a metal screen door, then two metal doors (going into the entranceway, and from the entranceway into the kitchen). The doors in between the other rooms so far will have curtains, so only curtain rails were needed at this stage.

The windows in the entranceway and kitchen all have screens, while the double-glazed polycarbonate windows, which take up most of the south wall of the living and dining rooms, do not open.

The day we hung the screen door and moved the mosquito netting from the door of the room we currently live in to the doorway going up into what will be the kids' rooms was a great day – the whole space is now fly and mosquito free!!!!!

Basically, everything is sealed off and weatherproof, with the exception of the doorway going up to the kids' rooms. It is still open (with a mosquito netting over it) and so lets in the rain. But this will get taken care of over the next couple of weeks, when we build the roof of the kids' rooms, thereby covering the doorway, if not closing it off.

More Photos

The Roof and Water Catchment

Seeing as it's rain season, water is of particular interest, as this is when we collect most of our year's water. That said, getting the roof totally finished was a priority.

When I say roof, I actually mean roofs, as it not only includes the kitchen, dining room, living room (30ft x 13ft total), but also the entranceway (6ft x 8ft) and the building we are currently living in (12ft x 20ft). All of the roofs connect and are curved in an arch, which is structurally far stronger than a flat surface, and obviously increases the surface area (for example, instead of the 30ftx13ft floor area, the roof is 30ft x15ft).

From the inside to outside, the roofs consist of:
a ceiling of arched rafters and tin
8 inches of polystyrene
a layer of black plastic
a 3 inch concrete slab, reinforced with rebar and remesh. Our mix was 3:1 sand/cement, with fibers and waterproofing agent added
a layer of cement, lime and fibers
waterproofing acrylic paint, which we applied in 2 coats with a fabric in between. This fabric gives the paint flexibility and strength, so should a small crack appear in the concrete, the paint will not crack on top of it

The hardest aspect of this roof was making sure that the gutters didn't have any low spot where water could pool.

When it was all finished we let a couple of rains wash it off really well, then hooked it up to our system. A little under 4 inches collected over 1200 gallons. Unfortunately (well, fortunately, I guess) our tanks are now all full. We have bought another 1000 gallon tank, which we will be setting up this week. Our plan had been to build an7000 gallon concrete tank, for which the hole is already dug and a road to it cleared, but the house has taken longer than expected, so we have postponed that project until the Spring. Still, we have easily enough to last us through until the next rains, and then next year, with the added 7000 gallons, will see us with enough to really take gardening seriously.

On a side note, our pond now has quite a bit of water in it. We need to cut a few trenches to channel the water better, but have not yet had chance. Still, it increases with each rain and holds the water really well. Little by little.

More Photos

2 months since my last post...

It has been so long since I wrote a blog that I really don't know where to begin.

First of all, my apologies for not getting to it sooner. I know that certain members of the family (no names, Janet) have been missing the videos and photos of Leo, while others have been wondering if we're even alive. I am sorry. We have just been very busy. We work on the house week days (usually pretty tired week nights) and then Abe has been working on the computer at the weekends. Meanwhile, Leo is growing like a weed and it is no longer possible to play with him while blogging – he demands ALL your attention or else he'll get himself into all kinds of trouble! That, coupled with the garden, cooking, cleaning, laundry, vehicle maintenance, etc. etc. etc. we have had little spare time. Still, things are easing up a little, often because work gets called off due to rain, so I'm getting to it now.

Things have changed so much here that it's probably best to do an overview of the various things we've accomplished. So here goes... there are going to be several entries!!!!

Blog Archive