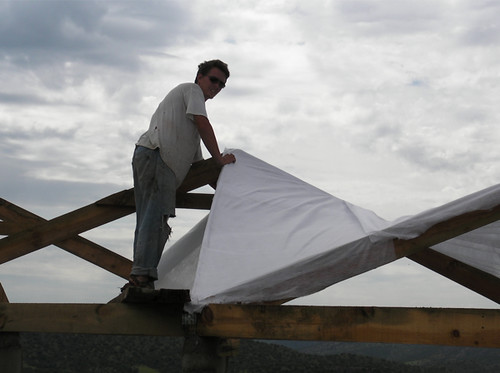
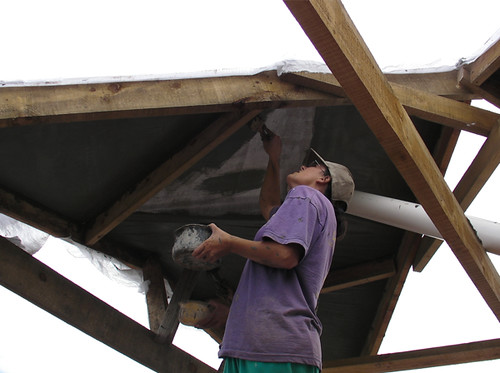
 Despite only having three work days this week, due to rain, we have got the first two coats of latex concrete on the kids' rooms roof.
It's too soon to tell, but we think we have found the way we will do roofs from now on. We are always looking for the best way to build, balancing the Time, Cost, Energy factors (strength and durability being things that cannot be compromised). Walls are easy, with endless good options out there, but the roof is one of the most important and expensive elements of a building, and up until now we have not found the system for us. However, that seems to have changed...
Its advantages are that:
- it is very light, so the support structure does not need to be as extensive as with other materials.
- it sets up super fast, so you don't have to be as scared of clouds on the horizon as with concrete.
- it is very fast to apply, almost equally the speed of putting up tin, which is a material we do not want to use as it does not last as long or look or sound (in rain) as nice as concrete options.
- for its strength, durability and speed, it is cheap.
- it allows for many different designs, though a pyramid structure seems to be the most efficient.
We had never tried this method before, but it was very easy. This is what we did:

- We made a wooden frame, in a three peak design, set on concrete posts.
- We then stapled two layers of fiberglass screen onto the frame, alternating the direction of the fabric for each layer.
- Once the fabric was in place, we poured our mix onto it and brushed it in with long-handled broom type things. The mix wants to be pretty liquid for this first coat, so that it penetrates the fabric.
- We then used paint brushes to put a slightly thicker mix onto the underside.
- We left three of holes in the structure, at the tops of the peaks, so that we can pour the next coats easier. We will pour these before we do the final coat, when we can walk on top. Latex concrete binds very well to itself, so we do not have to worry about cold joints, as with concrete.

The mix for these first two layers was a 1:1 of acrylic and cement, adding a little water to make it more runny. We used a product called Sikalatex, but we ran out and have moved on to a 100% acrylic concrete bonding.
We will now put 3 more layers on top, though these will consist of a 1:1:1 acrylic, cement, and fine sand. Even after just two coats, the structure is hard (will probably be able to walk on it after just one more coat) and fairly waterproof - water seeps through as it cures, but does not really drip. We should be able to do two coats in a day.
For photos, click here.
How do you transfer loads on the concrete to the structure? How thick is the concrete?
ReplyDeleteThe fabric is attached to the lumber structure and it is then encased in concrete, making it a whole. The concrete is about 3/8 inch thick in total.
ReplyDeleteDoes that answer your question.
how do you deal with roof damage like tree branchs falling or flex in high winds? does the extra weight of rainwater stretch the fabric and lastly how do you insulate ubdr neath it?
ReplyDeleteSorry this has taken so long to reply.
ReplyDeleteFirst off, should there be any damage caused to the roof, it is very easy to fix. You just wet the area around the hole with latex concrete and add more fabric, soaked in latex concrete. Keep adding latex concrete in layers as you would with a new roof. The latex adheres very well to itself.
Secondly, there is no flex in wind. It is a hard shell. You can walk on it.
Thirdly, there is no problem with the weight of rain water. The peaks are fairly steep, allowing water to run off it fairly fast. We collect all our water and have never had any problem with weight of water. More important than rain is snow, which does not run off as well as water. Just make sure your roof is not flat - the more peaked, the better, up to a point.
As for insulation. We put insulation in the peak part and will have a flat ceiling attached to the bottom of the base frame.
If you are interested in this method, an excellent book is "Latex Concrete Habitat" by Dr Knott and Dr Nez. They have been using this method for several decades, and deal with any issues you might encounter.
Can you be more specific about how you attached the fiberglass (nails, screws, staples?) and exactly what weight of fiberglass was used, etc?
ReplyDelete....just discovered your blog yesterday. I'm finding it all very interesting.... esp this particular bit about the latex concrete. Anyway, I'll def do more reading on it...thanks for the reference to the "Latex Concrete Habitat" book. Thanks for keeping up your blog as you build...very interesting and encouraging.
ReplyDeleteThis whole information is absolutely interesting. i like this blog because is easily understandable, and that is invaluable to the readers. Beyond all doubt La Tex will be very useful for everybody who want to prove it.
ReplyDeletebuy viagra
Just stumbled across this page doing research on this method of roofing. Can you tell me what type of glass fabric that is and where you got it?
ReplyDeleteAlso, how did you construct those concrete pillars?
Thanks!
John
this system of roof construction has only recently come to my attention as i am doing research on social housing. i was searching for nez roof system but less information is available under the inventors name.
ReplyDeletei've ordered the book but wanted to ask. what exactly is the source of the latex? can you use old paint as the source of latex?
if you had to breakdown the budget where was the biggest expense? comparatively speaking it seems inexpensive. would you agree?
also, any concerns around collecting the rain water from the roof? any possible off-gasing?
thank you.
rej
for the concrete pillars, read this: http://www.velacreations.com/fabricforms.html
ReplyDeletedon't use paint, use a concrete additive or acrylic bonding compound. The book explains the details on the acrylic.
It is inexpensive, but I think you could make it cheaper by designing a removable frame.
We painted the roof to get a white color, so any rainwater issues are taken care of.
Concrete roofs are not so good in many of climate thanks for sharing. Liquid Roof Repair
ReplyDeleteLatex or acrylic concrete is an underused and little known form of concrete. It can be used to make good quality roofs. It is really lightweight in nature. It sets down fast, so you don't need to worry about the clouds on the horizon. Due to its strength, durability and speed it is cheap. Roofers Fort Lauderdale is a well trusted company in the roofing business. Its employees are skilled, hardworking and they can work on any sort of roof which a customer desires.
ReplyDeleteI really enjoyed reading this post, big fan. Keep up the good work andplease tell me when can you publish more articles or where can I read more on the subject?
ReplyDeleteCertified Precision Roofing
A latex concrete roof is a durable, lightweight roofing solution that combines latex with cement for flexibility and strength. Ideal for various structures, it resists cracks and weather damage. Openings like a door roofing can be integrated for easy access and ventilation.
ReplyDelete