Vela Creations is an in-depth resource for off grid living. The site documents our research and experiences, hoping that they might help others interested in pursuing this lifestyle. This blog is designed to document our day to day experiences as we build our new, sustainable homestead. If you are interested in seeing more photos and videos, we have a flickr account at the following url: http://flickr.com/photos/35090117@N05/collections/

Showing posts with label roof. Show all posts

Sunday, October 31, 2010

Hot water panels

We worked again on the hot water system this week.

I finished interior stucco, but I still have other concrete work to do.

SANY6744 Abe stripped, cleaned, tested and put up the solar water heating panels. They are each 8 feet by 4 feet metal, insulated boxes, with copper pipes (painted black) snaking back and forth inside. They are then closed with glass.

The panels were on the verge of being thrown away some months ago in New Mexico. They were saved from the dump by Abe's dad, Jim, who is just as loathe as Abe to see anything useful become trash. Though he didn't need them, he immediately told the guy that his son would use them, so the man gave them to Jim for free. One of the panel's glass was broken and they were a little dirty, but otherwise in perfect condition.

They now have a new home, mounted on our roof. You cannot hold your finger inside the copper pipe as it gets way too hot.

This week, we work on the tank and controls. Next week, we should be having hot showers inside our bathroom!

For all of the photos, click here.

Saturday, August 29, 2009

Gutters


The roof to the kids' rooms is now finished.

- We put the remaining layers of latex concrete on the roof.
- We filled up the holes we had left for easier access.
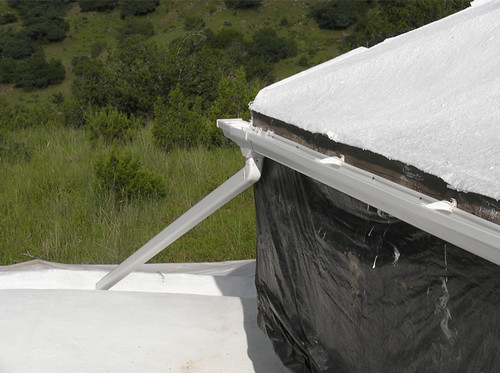
- We painted the whole thing with a white waterproofing paint.
- We attached gutters to the sides.

So that roof is now done and catching water.

More photos

Friday, August 21, 2009

Latex Concrete Roof

Despite only having three work days this week, due to rain, we have got the first two coats of latex concrete on the kids' rooms roof.

It's too soon to tell, but we think we have found the way we will do roofs from now on. We are always looking for the best way to build, balancing the Time, Cost, Energy factors (strength and durability being things that cannot be compromised). Walls are easy, with endless good options out there, but the roof is one of the most important and expensive elements of a building, and up until now we have not found the system for us. However, that seems to have changed...

Its advantages are that:
- it is very light, so the support structure does not need to be as extensive as with other materials.
- it sets up super fast, so you don't have to be as scared of clouds on the horizon as with concrete.
- it is very fast to apply, almost equally the speed of putting up tin, which is a material we do not want to use as it does not last as long or look or sound (in rain) as nice as concrete options.
- for its strength, durability and speed, it is cheap.
- it allows for many different designs, though a pyramid structure seems to be the most efficient.

We had never tried this method before, but it was very easy. This is what we did:
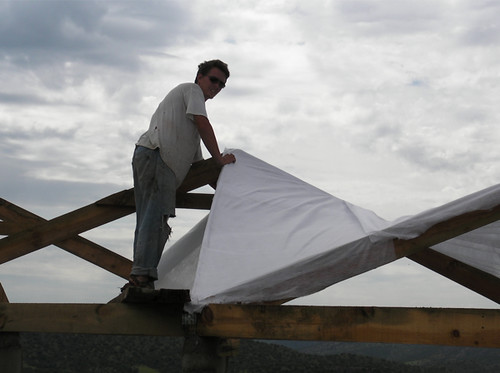
- We made a wooden frame, in a three peak design, set on concrete posts.
- We then stapled two layers of fiberglass screen onto the frame, alternating the direction of the fabric for each layer.
- Once the fabric was in place, we poured our mix onto it and brushed it in with long-handled broom type things. The mix wants to be pretty liquid for this first coat, so that it penetrates the fabric.
- We then used paint brushes to put a slightly thicker mix onto the underside.
- We left three of holes in the structure, at the tops of the peaks, so that we can pour the next coats easier. We will pour these before we do the final coat, when we can walk on top. Latex concrete binds very well to itself, so we do not have to worry about cold joints, as with concrete.
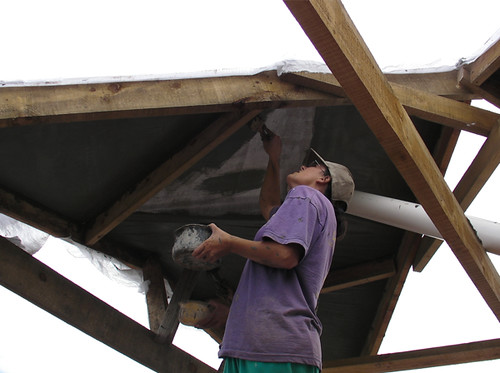
The mix for these first two layers was a 1:1 of acrylic and cement, adding a little water to make it more runny. We used a product called Sikalatex, but we ran out and have moved on to a 100% acrylic concrete bonding.

We will now put 3 more layers on top, though these will consist of a 1:1:1 acrylic, cement, and fine sand. Even after just two coats, the structure is hard (will probably be able to walk on it after just one more coat) and fairly waterproof - water seeps through as it cures, but does not really drip. We should be able to do two coats in a day.

For photos, click here.

Sunday, August 2, 2009

The Roof and Water Catchment

Seeing as it's rain season, water is of particular interest, as this is when we collect most of our year's water. That said, getting the roof totally finished was a priority.

When I say roof, I actually mean roofs, as it not only includes the kitchen, dining room, living room (30ft x 13ft total), but also the entranceway (6ft x 8ft) and the building we are currently living in (12ft x 20ft). All of the roofs connect and are curved in an arch, which is structurally far stronger than a flat surface, and obviously increases the surface area (for example, instead of the 30ftx13ft floor area, the roof is 30ft x15ft).

From the inside to outside, the roofs consist of:
a ceiling of arched rafters and tin
8 inches of polystyrene
a layer of black plastic
a 3 inch concrete slab, reinforced with rebar and remesh. Our mix was 3:1 sand/cement, with fibers and waterproofing agent added
a layer of cement, lime and fibers
waterproofing acrylic paint, which we applied in 2 coats with a fabric in between. This fabric gives the paint flexibility and strength, so should a small crack appear in the concrete, the paint will not crack on top of it

The hardest aspect of this roof was making sure that the gutters didn't have any low spot where water could pool.

When it was all finished we let a couple of rains wash it off really well, then hooked it up to our system. A little under 4 inches collected over 1200 gallons. Unfortunately (well, fortunately, I guess) our tanks are now all full. We have bought another 1000 gallon tank, which we will be setting up this week. Our plan had been to build an7000 gallon concrete tank, for which the hole is already dug and a road to it cleared, but the house has taken longer than expected, so we have postponed that project until the Spring. Still, we have easily enough to last us through until the next rains, and then next year, with the added 7000 gallons, will see us with enough to really take gardening seriously.

On a side note, our pond now has quite a bit of water in it. We need to cut a few trenches to channel the water better, but have not yet had chance. Still, it increases with each rain and holds the water really well. Little by little.

More Photos

Saturday, May 16, 2009

Pouring the roof

The roof is now truly underway.

Abe and a couple of others put 8 inches of polystyrene over the whole thing and covered that with black plastic. They then put rebar and remesh over the plastic, and tied that into the metal framework of the gutters.

I'm still not able to help much on this kind of thing after my operation, and I hate not being involved. However, there were a couple of days when I was kind of glad - the days when they were up on the roof and it was 100 degrees in the shade (it's usually low 90s at the moment). All of them looked like they'd just spent a month at sea!

On Wednesday, 6 people came to help. We had two on the mixer, one moving the wheelbarrows to where they were needed, two passing the concrete up, and two on top, trowelling. I kept waters filled and got things people needed, Leo perched on my hip.

The mix we do is 12 shovels sand, 4 shovels cement, a big handful of concrete fibers, and a handful of a waterproofing additive. They did 47 loads in a little over three hours, giving us a brand new concrete roof. They then poured and trowelled the slopes of the gutters - a two inch rise over 30 feet. It was a good day.

We'll put another cap on the whole thing before painting it, but this was the big hurdle. At least we'll be able to walk on it without scaffolding for the next layer.

Click here for more photos

Sunday, April 5, 2009

Roof begins!

We gave up waiting on the wind and decided to start the roof anyway. We are beginning with the roof on the building we're living in. (photos)

We did it in sections, 8 foot at a time.

We lay 2 layers of 4" polystyrene down. The wind caused less problems than we had thought, although several pieces did fly off and down the hill! We then covered this with black plastic, and put remesh over the whole thing, tying it into the gutters. At this stage, it was all held down really well and the wind ceased to be a problem.

We put bits of polystyrene under the parts of the remesh that touched the black plastic and poured a concrete slab over it all. The concrete was a 3:1 sand/cement mix with fibers and a waterproofing agent added. We will later put another layer over the whole thing once the gutters are done. 3 of us got 16 foot doone in a day, a tiring day!

It has begun!

We have already noticed the difference in temperature inside the room.

Bits and pieces

While waiting for the wind to die down, we filled our time by doing some odds and ends.

Abe prepped the roof of the room we are living in for the roof by tying rebar and lathing to the gutters, as they have to be lengthened to allow for the insulation. (photos)


I did a little more work on the flowers beds. (photos)


We then poured the backing and shelf behind a bench we'll be making in the living room. (photos)

Saturday, March 21, 2009

Ceiling done!

Despite copious amounts of sniffles and coughs from us and our crew, we managed to get a lot accomplished this week.

Abe and Eliseo got the ceiling finished - putting up the final boards and all the tin (for photos click here). All of a sudden, the place has taken shape, looking and feeling like a house. We now have a bunch of shade and protection from any wind or rain that might (or might not) come. It has to be said that it didn't turn out as well as we expected. The tin was too floppy and did not keep the shape that well. On the other hand, it's not going to matter. Once it's textured and painted, you won't be able to notice, and it's the roof itself (which we have now begun to prep for) that is of structural importance. We just won't use this system again... the quest for the perfect roof continues.

Meanwhile Estela and I did stucco, making the walls meet the arched ceiling and doing some finishing details.

We also got started on the hole for the cistern. Now that our catchment area will be increasing, we need to increase our storage capacity as well, so we will be building a 7000 gallon ferro-cement cistern.

The next step is the concrete roof. We went and bought some materials, have started screening sand and have begun wiring the house. In another week we should be ready to pour the roof and gutters.

Blog Archive