We had a rain a few days ago that didn't amount to much, but did come down very hard and fast. Abe went out to check on how the new tank was performing and discovered that the gutters were overflowing the pipes.
It seems we underestimated the volume of water that comes off the roof in a hard rain. Abe found a great website that tells you how to calculate what size pipe you need to accommodate what force of rain.
We added an extra line of 2” pipe. We could have changed the whole thing to a 4” pipe (which is more than we would have needed as 4” pipe is way more than two 2” pipes, because the area of a circle is the radius squared), but it was less work and less expensive to add an extra line – one line for each side of the roof.
However, having increased the pipes into the tank, we then had to increase the overflow. If the tank is full and water is coming in two 2” pipes, but can only leave through one 2” pipe, we will have a problem. It will overflow out the top, risking water getting behind the liner and dislodging it. So Abe put an extra overflow, making it a 4” pipe just to be safe.
We have now finished the tank... again!
Know that we make these mistakes for the benefit of our readers. If we didn't make the mistakes, we wouldn't know the problem existed and we couldn't prevent others from making them! No need to thank us, just happy to help.
Click here for photos of the tank.
Showing posts with label cistern. Show all posts
Showing posts with label cistern. Show all posts
Tuesday, August 24, 2010

Saturday, August 7, 2010
The cistern is finished
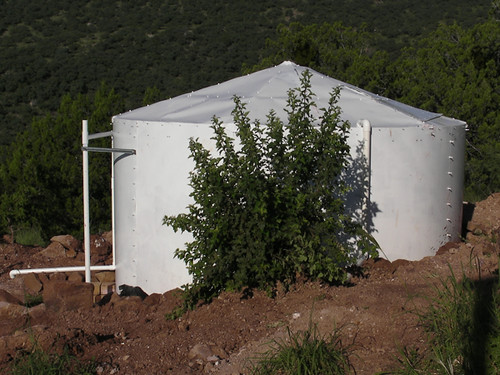 We had a week of clear skies, allowing everything to dry out so that we could get a little work done outside.
We had a little cleanup work to do in and around the tank, of course, after so much rain. After that, we:

* put up some vinyl over the bolts, to protect the liner from any sharp edges.
* put up the liner track
* unfolded the liner and put it into the track (very easy as it happens)
* cleaned any mud off the liner
* did the plumbing
The plumbing deserves a little explanation to itself, as it might not be apparent from the photos. The roof has two downspouts, which connect into the same line, buried in the ground (we will eventually concrete around the pipes from the roof to the ground). That line goes into the tank at the top (which is several inches lower than the downspouts of the gutter). Within the line, at the lowest spot, Abe put in a clean-out valve, which we will be hooking onto a hose this week. This allows us to clean out the water that stays in the line periodically.
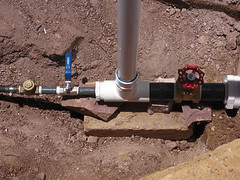 The plumbing from the tank to the house is as you would expect. Coming out of the tank there is a main valve, then a pipe rising into the air, then another valve, then a check valve. The pipe then connects with the existing pipe coming from the cistern (1000 gallons) that is still on the system, and then into the house. The only thing needing extra info is the overflow pipe (the one that goes up into the air). This goes up and pours out where we want the overflow to be. There is another part that is there only if we one day want to add a backup overflow.
So now it's all completely done, minus a few 5 minute jobs (like putting a screen in the gutter, etc.), and we are ready for it to rain. Just need 10 inches to fill her up - over 7000 gallons.
And now the cistern is completely finished.
For all photos, see here.
Sunday, July 25, 2010
Tank update
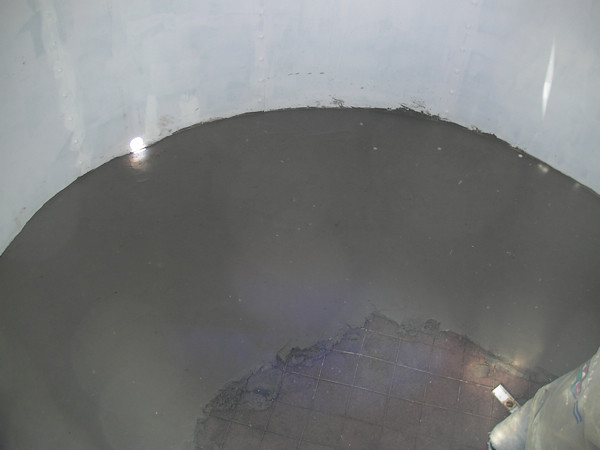
We haven't advanced too much from my last post on the cistern, after which we got a huge amount of rain. Everything was so wet that we couldn't get sand for many days. It finally dried up enough to get sand and we did get a slab poured inside the tank. The slab will offer a smooth, strong surface for the liner to sit on, but more importantly it will hold the metal in its shape at the bottom. It also all slopes towards the out-take, making it easy to empty and clean out should we need to do so.
We also got the trenches for the plumbing dug.
We don't have many days left of work to be able to finish it, but it is raining again this weekend, so we'll have to see how it goes. Probably won't be able to do anything until at least Wednesday.
We wish we could have got it all done before the rains had started, but our other projects took longer than we thought and the rains came a little early this year. Oh well, no biggie. We only need 10 inches of rain to be able to fill it, and we should easily have that left once we finish it.
Saturday, July 10, 2010
Cistern

Our current project is building a 7200 gallon water tank. We have had 12" of rain so far this year (3.5 last night!!), which would have filled the tank had it been ready at the beginning of rain season. Still, we have more than enough rain left to fill it.
It is 8 feet tall, 12+ feet diameter and about 40 feet circumference.
- We had to dig it down about a foot and a half extra from where we had previously had the hole, so that the intake for the tank would be a bit lower than the downspout for the gutter. This extra foot and a half was in almost solid rock, which makes for a super stable base!
- We added a few inches of sand over the whole area.
- We marked the center of the hole with a rebar, where diagonals from each corner meet.
- We laid bricks in a level circle for the metal of the tank to sit on. We attached a string to the center rebar and marked a circle which would show where to lay the bricks.
- Using a jig we'd made, we drilled holes every 6 inches on both sides of the sheets of metal. There are 10 sheets of metal, each 8' x 4'.
- We bolted the sheets of metal together into a circle that sits on the center of the bricks.
- We welded and attached a frame for the roof.
- Painted everything with primer and Rustoleum.
- Filled dirt in around the cistern on the outside. This must be done evenly all the way around, so as not to shift the circle of metal.
- Attached metal to roof. The edges of this we bent inside the walls and screwed it into the walls. This allows water to run off the roof into the tank.
For photos of it all, see here.
Saturday, May 30, 2009
South wall
 We have made a lot of progress the past couple of weeks. I am now able to work full time again, and I had forgotten how much I love stuccoing! I have no pain in my stomach at all.
We've been leveling (with a two inch incline over thirty feet) and stuccoing the gutters, which are now ready for rain. (photos)
We have also begun on the south windows. The south walls of the dining room and living room are almost entirely window. This not only allows for solar gain in winter, but also year-round growing, as there are flower beds (which will use grey water from the bathroom and kitchen) at their base. Abe welded up and hung the window frames and we are now stuccoing around them. It has really changed the look of the place. (photos)
Have finished digging out the cistern hole, which is the next project once we finish these rooms. (photos)
We feel as though the end is finally in sight. There's still a lot to do, but each week sees the list get smaller and the house look prettier. We are ready for this too be done, that's for sure!
Saturday, March 21, 2009
Ceiling done!
 Despite copious amounts of sniffles and coughs from us and our crew, we managed to get a lot accomplished this week.
Abe and Eliseo got the ceiling finished - putting up the final boards and all the tin (for photos click here). All of a sudden, the place has taken shape, looking and feeling like a house. We now have a bunch of shade and protection from any wind or rain that might (or might not) come. It has to be said that it didn't turn out as well as we expected. The tin was too floppy and did not keep the shape that well. On the other hand, it's not going to matter. Once it's textured and painted, you won't be able to notice, and it's the roof itself (which we have now begun to prep for) that is of structural importance. We just won't use this system again... the quest for the perfect roof continues.

Meanwhile Estela and I did stucco, making the walls meet the arched ceiling and doing some finishing details.
We also got started on the hole for the cistern. Now that our catchment area will be increasing, we need to increase our storage capacity as well, so we will be building a 7000 gallon ferro-cement cistern.
The next step is the concrete roof. We went and bought some materials, have started screening sand and have begun wiring the house. In another week we should be ready to pour the roof and gutters.
Subscribe to:
Posts (Atom)