We had a rain a few days ago that didn't amount to much, but did come down very hard and fast. Abe went out to check on how the new tank was performing and discovered that the gutters were overflowing the pipes.
It seems we underestimated the volume of water that comes off the roof in a hard rain. Abe found a great website that tells you how to calculate what size pipe you need to accommodate what force of rain.
We added an extra line of 2” pipe. We could have changed the whole thing to a 4” pipe (which is more than we would have needed as 4” pipe is way more than two 2” pipes, because the area of a circle is the radius squared), but it was less work and less expensive to add an extra line – one line for each side of the roof.
However, having increased the pipes into the tank, we then had to increase the overflow. If the tank is full and water is coming in two 2” pipes, but can only leave through one 2” pipe, we will have a problem. It will overflow out the top, risking water getting behind the liner and dislodging it. So Abe put an extra overflow, making it a 4” pipe just to be safe.
We have now finished the tank... again!
Know that we make these mistakes for the benefit of our readers. If we didn't make the mistakes, we wouldn't know the problem existed and we couldn't prevent others from making them! No need to thank us, just happy to help.
Click here for photos of the tank.
Showing posts with label tank liner. Show all posts
Showing posts with label tank liner. Show all posts
Tuesday, August 24, 2010

Saturday, August 7, 2010
The cistern is finished
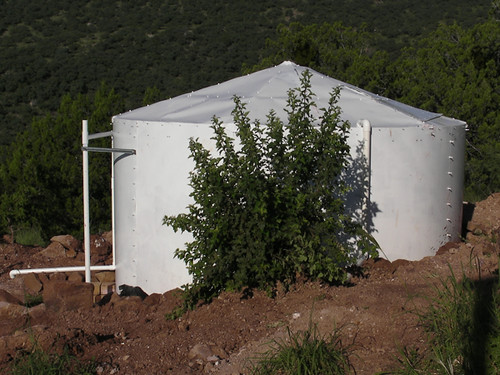 We had a week of clear skies, allowing everything to dry out so that we could get a little work done outside.
We had a little cleanup work to do in and around the tank, of course, after so much rain. After that, we:

* put up some vinyl over the bolts, to protect the liner from any sharp edges.
* put up the liner track
* unfolded the liner and put it into the track (very easy as it happens)
* cleaned any mud off the liner
* did the plumbing
The plumbing deserves a little explanation to itself, as it might not be apparent from the photos. The roof has two downspouts, which connect into the same line, buried in the ground (we will eventually concrete around the pipes from the roof to the ground). That line goes into the tank at the top (which is several inches lower than the downspouts of the gutter). Within the line, at the lowest spot, Abe put in a clean-out valve, which we will be hooking onto a hose this week. This allows us to clean out the water that stays in the line periodically.
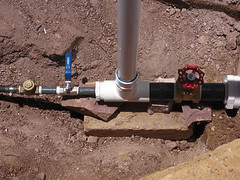 The plumbing from the tank to the house is as you would expect. Coming out of the tank there is a main valve, then a pipe rising into the air, then another valve, then a check valve. The pipe then connects with the existing pipe coming from the cistern (1000 gallons) that is still on the system, and then into the house. The only thing needing extra info is the overflow pipe (the one that goes up into the air). This goes up and pours out where we want the overflow to be. There is another part that is there only if we one day want to add a backup overflow.
So now it's all completely done, minus a few 5 minute jobs (like putting a screen in the gutter, etc.), and we are ready for it to rain. Just need 10 inches to fill her up - over 7000 gallons.
And now the cistern is completely finished.
For all photos, see here.
Subscribe to:
Posts (Atom)