Vela Creations is an in-depth resource for off grid living. The site documents our research and experiences, hoping that they might help others interested in pursuing this lifestyle. This blog is designed to document our day to day experiences as we build our new, sustainable homestead. If you are interested in seeing more photos and videos, we have a flickr account at the following url: http://flickr.com/photos/35090117@N05/collections/

Showing posts with label concrete fibers. Show all posts

Sunday, November 1, 2009

Foundations

We poured the foundations for the brick, exterior walls (42 linear feet, 10 inches thick, 6 inches deep, with two strands of 1/2 inch rebar running through them) and for the interior, stud walls (20 linear feet, 6 inches thick, 6 inches deep, with two strands of 3/8 inch rebar running through them).

First of all, Abe compacted all the sand sub floor with a compacter we borrowed from our local city council. Yes, that's right, I did say borrow - our city council lends out its tools, no charge, to its constituents. It also delivers our sand by the dump truck load for $18, and we had a load arrive this week.

Next, we set up the forms for the foundations. We used fabric forms. We loved the system for pouring posts and have been eager to try it out on foundations. It worked a treat. We used 2"x4" lumber, raised up to the level we wanted on little stilts, which were pounded into the compacted sand. We leveled the top of these boards. We then stapled black plastic to the top of the boards, allowing it to sag down to the ground the depth and width we wanted. We put in our rebar reinforcement and our corner castillos, and then poured a 3:1 mix with added concrete fibers.

We are now in the process of filling the rooms up with sand, up to the level of the foundations.

More photos

Saturday, August 8, 2009

2 stairs done

We also started pouring the steps going from the dining room to the kids' rooms.

We had thought about doing them all together, but the formwork would have been complicated. Instead, we figured we would do one step a day, keeping our formwork to little more than board and a backfill of sand.

We used fibers in the mix, and added metal to both the horizontal and vertical part of the step. At the end of the pour, we added dry cement, which we trowelled in to soak up excess water, and we then floated them once the concrete had hardened a little. They have come out super smooth and nice.

Each step (other than the first) will be 7.5 inches tall and 11 inches deep..

2 down, 6 to go. We're moving up.

More photos

Saturday, May 16, 2009

Pouring the roof

The roof is now truly underway.

Abe and a couple of others put 8 inches of polystyrene over the whole thing and covered that with black plastic. They then put rebar and remesh over the plastic, and tied that into the metal framework of the gutters.

I'm still not able to help much on this kind of thing after my operation, and I hate not being involved. However, there were a couple of days when I was kind of glad - the days when they were up on the roof and it was 100 degrees in the shade (it's usually low 90s at the moment). All of them looked like they'd just spent a month at sea!

On Wednesday, 6 people came to help. We had two on the mixer, one moving the wheelbarrows to where they were needed, two passing the concrete up, and two on top, trowelling. I kept waters filled and got things people needed, Leo perched on my hip.

The mix we do is 12 shovels sand, 4 shovels cement, a big handful of concrete fibers, and a handful of a waterproofing additive. They did 47 loads in a little over three hours, giving us a brand new concrete roof. They then poured and trowelled the slopes of the gutters - a two inch rise over 30 feet. It was a good day.

We'll put another cap on the whole thing before painting it, but this was the big hurdle. At least we'll be able to walk on it without scaffolding for the next layer.

Click here for more photos

Sunday, April 5, 2009

Roof begins!

We gave up waiting on the wind and decided to start the roof anyway. We are beginning with the roof on the building we're living in. (photos)

We did it in sections, 8 foot at a time.

We lay 2 layers of 4" polystyrene down. The wind caused less problems than we had thought, although several pieces did fly off and down the hill! We then covered this with black plastic, and put remesh over the whole thing, tying it into the gutters. At this stage, it was all held down really well and the wind ceased to be a problem.

We put bits of polystyrene under the parts of the remesh that touched the black plastic and poured a concrete slab over it all. The concrete was a 3:1 sand/cement mix with fibers and a waterproofing agent added. We will later put another layer over the whole thing once the gutters are done. 3 of us got 16 foot doone in a day, a tiring day!

It has begun!

We have already noticed the difference in temperature inside the room.

Saturday, February 28, 2009

Bottle Wall


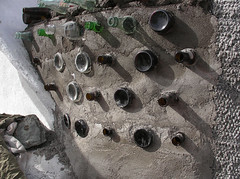
While Abe and a friend have started to frame the roof (I'll make a post on that at a later date, when it is a little further along), I begun a small bottle wall that joins the current building to the new one on the south side.

It's a slow, but very enjoyable project. I've only done 5 layers so far, but the light already comes through and the wind plays them like an instrument.

I'm using a 3:1 mix with added fibers and I LOVE the fibers. They are cheap, but make the stucco so much easier to smooth and sculpt. Plus there has been no cracking, even though it has been hot and very windy, and my covering is constantly blown off.

We are using bottles found by the side of the road. Unfortunately, we don't have much variety beyond clear and brown, although Abe did find 4 blue bottles on his last city trip, which will be going in soon!

For more photos, click here.

Blog Archive